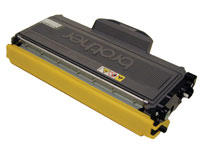
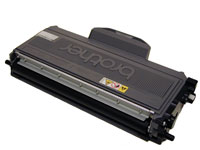
Released in January 2008, the Brother HL-2170W printer
engine is based on a new 22-ppm, true 1,200-dpi laser engine. These
machines have a first page out in less than 10 seconds, and come
standard with 8MB, 16MB or 32MB of memory depending on the machine. The
HL-2170W also is wireless capable. All machines come with a starter
cartridge rated for 1,000 pages. The first section of this article
covers the theory behind these cartridges. The first three paragraphs
have some interesting information on the reset gears and how they work.
The rest is standard Brother theory. If you are not familiar with
Brother cartridges, it would be best to read through this entire
section. It may save you a few very frustrating hours.
Current
machines released so far are:
HL-2140
HL-2150N
HL-2170W
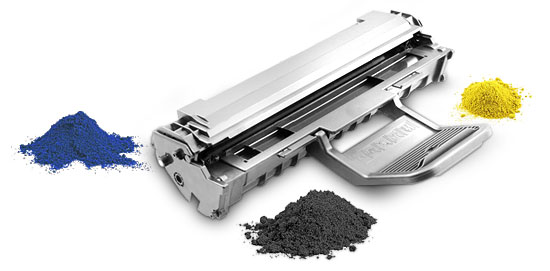
There are two different yielding toner cartridges available for
these machines, the TN-330 and TN-360 (TN-2110/2120 Europe, TN-2130/2150
Asia). The TN-330 cartridge is rated for 1,500 pages at 5 percent
coverage; the TN-360 is rated for 2,600 pages at 5 percent. The drum
unit is new as well with part no. DR-360 (DR-2125, DR-2100) and is rated
for 12,000 pages. It will be covered in a future article.
There
is a set of reset gears that reset the printer each time a new toner
cartridge is installed. Previous Brother cartridges have used a reset
gear before, but this is the first time a set of gears has been used.
The starter cartridges that come with new printers do not have these
gears. Both the TN-330 and TN-360 cartridges use different reset gears
sets. The TN-330 gears, in addition to being a different color than the
TN-360, have a shorter gear train. That is how the machine knows if
there is a standard or high-yield cartridge installed. New rest gears
are being developed.
An interesting point in the reset procedure
is what happens in addition to the counter being reset. When the
printer senses a new toner cartridge, the bias voltage is set to a high
voltage. As the cartridge is used, the bias voltage is gradually
reduced. This process is necessary because, according to Brother, a new
toner cartridge has a tendency to print light. As the cartridge is used,
the density increases. To keep the density level even throughout its
life, the density bias voltage is reduced accordingly. Each time a new
cartridge is installed, the bias voltage is reset to the high voltage
point, and the cartridge page count is reset to zero. Since different
yields would dictate different decreases in density over time, Brother
uses different reset gears. This was also done in the TN-550/580, but
after a time, Brother just went with the HY gear for both cartridges.
Time will tell what they do with these cartridges.
Another
interesting item of note is that these machines use a filter that seems
to be located after the fan. The service manual doesn’t mention anything
about it, and it’s not listed as a consumable. If you do repairs it’s
something to keep an eye on as the machine gets older.
Basic
Brother print theory
As with previous Brother cartridges,
the waste toner is repelled out of the drum cartridge and picked up by
the developer roller in the toner cartridge and brought back into supply
chamber. That is why there will always be a good amount of toner left
in the supply chamber when the cartridge is finished. This remaining
toner must be completely removed from the supply chamber before adding
new toner. Failure to do this will cause backgrounding. In addition to
contaminating the toner cartridge, this will also contaminate the
cleaning section of the drum cartridge, which in turn will contaminate
the toner cartridge again. The reasons for this are explained in the
following cartridge theory section.
The cleaning section of the
drum cartridge consists of a "cleaning brush” and a recovery blade. The
cleaning brush has two opposite charges placed on it during the print
cycle. The first attracts any remaining toner off the drum. The second
repels the toner off the brush back onto the drum where it then
transfers back into the toner cartridge. This is all done in a timing
sequence that does not interfere with the printing process. If the
cleaning brush becomes contaminated with bad toner that will not accept a
charge then the brush will be unable to clean itself and backgrounding
will occur. It seems to be the nature of contaminated toner that it will
accept most of the charge to be cleaned off the drum, but it will not
accept the charge that would allow the brush to clean itself off at all.
A properly working cleaning brush will at any given time have only a
small amount of toner on it. Once contaminated, toner will accumulate,
which will only cause the problems to worsen.
Since the waste
toner is transferred back into the supply of the toner cartridge, once
you print with a bad toner cartridge the drum unit will become
contaminated. Even when you change out the toner with a good properly
recycled or new OEM cartridge, the drum unit will transfer some of the
bad toner back into the good toner cartridge, which will again cause
backgrounding. Both cartridges will be contaminated again. It can be a
vicious circle.
The remaining "toner” in the cartridge is just
below the bare minimum that can maintain the proper charge level. When
the change toner light comes on, the toner will not charge up to the
proper level and will cause the backgrounding. As the toner cartridge
reaches the end of its useful life, the printer senses the low charge
level in the toner supply and will try to keep the charge level up. This
constant charging keeps an almost "empty” cartridge from backgrounding.
Once the printer fails to get the remaining toner up to the minimum
charge, the change toner light comes on. The cartridge at this point
will still be printing properly. If you were to take that same cartridge
out of the machine for a few days and then put it back in the printer
without doing anything to it, the cartridge will shade. This will happen
because the charge level that the printer was trying so hard to keep up
has dissipated out and the materials left can no longer accept a proper
charge.
What does this all mean?
1) Make
sure your cartridge technicians thoroughly clean out the supply chamber
of the toner cartridge.
2) In the event that they forget and you
have a shading cartridge, the toner must be completely cleaned out
again. Do not use the toner over! New fresh toner must be installed.
3) The drum unit has to be taken apart and cleaned out with emphasis
on the cleaning brush area. This is a very simple process but very
necessary once it is contaminated.
According to our tests, there
will be approximately 65 to 70 grams of toner left when the cartridge is
spent.
How to run test pages, printer troubleshooting, common
cartridge problems and how to read the cartridge serial number will be
covered at the end of this article.
Supplies
required
1) Brother 2170 black toner, 65
grams for the TN-330 and 100 grams for the TN-360
(preliminary amounts, testing is ongoing) 2) Reset gear
for the starter cartridge 3) Lint-free cotton cloths 4)
Toner magnet cloths 5) White lithium grease
Tools required
1) Toner-approved
vacuum 2) Phillips-head screwdriver 3) Small common
jewelers screwdriver 4) Needle-nose pliers
Remanufacturing
instructions
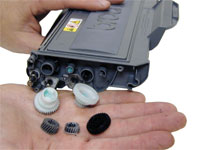
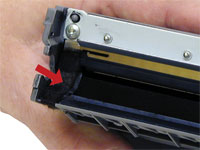
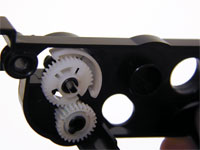
1) Vacuum the exterior of the cartridge.
2) Remove the fill plug from the toner cartridge. Dump the remaining
toner and vacuum or blow out the cartridge. Make sure the gear area is
clean. Leaving any toner in the teeth of the gears may cause a tooth to
be damaged and cause a clicking noise. We have found it best to use
compressed air to clean them out, but to also keep one hand over the
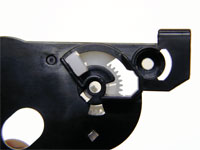
gears to protect them. See Figure 1.
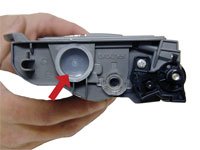
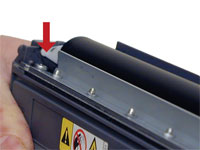
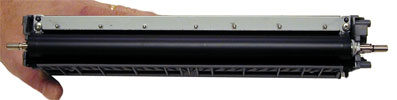
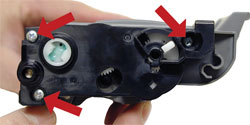
3)
On the non-gear side of the developer roller, remove the screw. See
Figure 2.
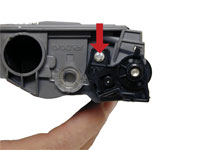
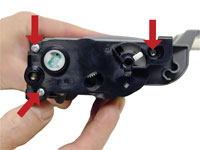
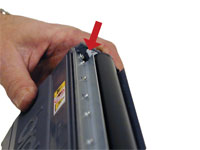
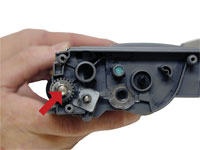
4) Remove the drum axle plate by pressing on the two tabs as indicated,
and pry the plate off. See Figure 3.
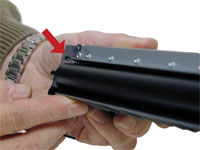
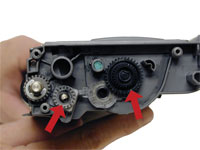
5) On the gear side, remove the three screws and cover plate. See
Figure 4.
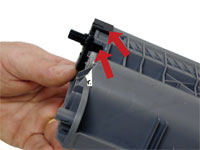
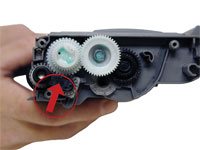
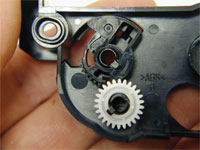
6) The reset gears are attached to the cover plate. These gears
reset the printer when a new cartridge is installed. New starter
cartridges do not have these gears. New replacement gears are being
developed now but until they are available, the starter cartridges
cannot be remanufactured. See Figure 5 and 6.
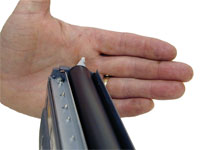
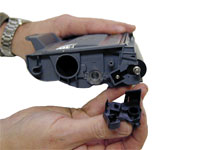
7)
Remove the black plastic spacer from the developer roller shaft. See
Figure 7.
8)
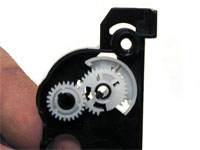
Remove the e-ring and small gear. See Figure 8.
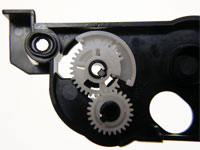
9) Remove all the remaining gears. See Figure 9.
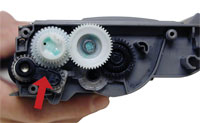
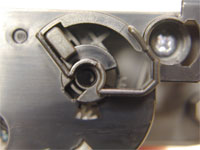
10) On the gear side of the developer roller, press in on the
locking tab and rotate the developer roller lockup. See Figures 10 and
11.
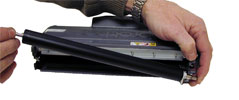
11) Remove the developer roller. See Figure 12.
12) Vacuum the doctor blade and foam feed roller clean. Until
new blades are available, we do not recommend the doctor blade be
removed or the developer roller felt seals disturbed. The doctor blade
can be easily cleaned by blowing the excess toner off and wiping it down
with a lint-free cloth. Be very careful not to leave any lint behind.
13) Inspect the magnetic roller felts. If they are
compressed (shiny), rough them up with a small screwdriver. See Figure
13.
14)
Clean the developer roller with a lint-free cloth. Do not use any
chemicals other than a dedicated cleaner for Brother rollers to clean
the roller. A dry clean cloth will work fine.
15)
Reinstall the developer roller long shaft side to the gear side (with
the white lock pointing up). Turn the lock toward the doctor blade until
it locks in place. See Figures 14 and 15.
16)
Install the small outside end plate and screw on the non-gear side.
Make sure the clear plastic plug for the optical sensor is locked in the
proper position. See Figures 16 and 17.
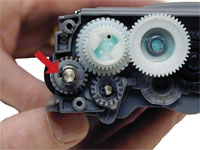
17)
Clean the gears, making sure they have no toner on them. This is a good
time to also check the gear shafts to make sure there is enough grease.
If the shafts appear dry, or the grease is contaminated with toner,
clean the shaft and inside of the gear. Replace the grease with white
lithium grease. See Figure 18.
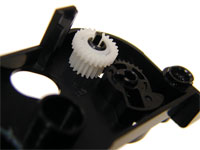
18)
Install the developer roller gear, c-ring, black axle spacer, and the
rest of the gears. Install the two large white gears last. Make sure all
the gears are meshing properly. See Figures 19, 20 and 21.
19)
Depending on the cartridge you have, set the two reset gears as shown.
See Figures 22, 23 and 24 (left column) for the TN-330 and Figures 25,
26 and 27 for the TN-360.
20)
Install the gear cover plate and three screws. See Figure 28.
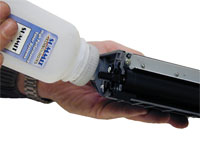
21)
Fill the cartridge with Brother 5200 black toner. See Figure 29.
22) Replace the fill plug. See Figure 30.
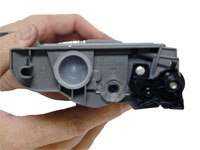
23)
Wipe the cartridge down to remove any remaining toner dust.
24)
Install the developer roller cover. See Figure 31.
Test
pages
Press the "GO” button three times with the front cover
closed and the ready light on. Depending on the machine, between one
and four pages will print out.
Machine troubleshooting
The HL-2100 series of machines have four LEDs to indicate the status
or various problems. We have listed some of the more common LED errors
here:
Toner light blinking, Status light on: Toner
low
Toner light on, Status light on: Toner out
Drum
light blinking: Drum life over soon
Drum and Error lights
blinking: Drum error
Error light on: Paper out
Error
light blinking: Cover open, paper jam, memory full
All four
lights blinking: Call for service
Defect
Chart
OPC drum 75.0mm
Upper fuser
roller 78.5mm
Lower pressure roller 78.5mm
Developer
roller 41.0mm
If you are experiencing
horizontal black streaks, and changing cartridges does not help, look in
the bottom of the paper tray. There is a small metal ground terminal.
If it gets bent or dirty, it can cause this.
How to
read the toner and drum cartridge serial numbers
All the
Brother toner and drum cartridges in this series have unique serial
numbers. The number contains information such as the month and year of
manufacture as well as other manufacturing data. Here is the breakdown:
The first character is a letter and represents the month of
manufacture. A is January, B is February and so on. The second character
is a number and is the year of manufacture. 8 is 2008, etc. The third
character is the manufacturing plant, and the fourth is the filling
amount. The next six are the serial number and the last is the assembly
line designation.
Mike Josiah is technical director at
Summit Technologies, a division of UniNet Imaging Inc., a global
distributor of toner, OPC drums, wiper blades and other supplies. Josiah
has been with the company since 1987. He and his technical support team
regularly contribute articles and teach seminars at association
meetings and trade shows. Contact him at 631-218-8376 or
mjosiah@uninetimaging.com.
 Released in January 2008, the Brother HL-2170W printer
engine is based on a new 22-ppm, true 1,200-dpi laser engine. These
machines have a first page out in less than 10 seconds, and come
standard with 8MB, 16MB or 32MB of memory depending on the machine. The
HL-2170W also is wireless capable. All machines come with a starter
cartridge rated for 1,000 pages. The first section of this article
covers the theory behind these cartridges. The first three paragraphs
have some interesting information on the reset gears and how they work.
The rest is standard Brother theory. If you are not familiar with
Brother cartridges, it would be best to read through this entire
section. It may save you a few very frustrating hours.
Released in January 2008, the Brother HL-2170W printer
engine is based on a new 22-ppm, true 1,200-dpi laser engine. These
machines have a first page out in less than 10 seconds, and come
standard with 8MB, 16MB or 32MB of memory depending on the machine. The
HL-2170W also is wireless capable. All machines come with a starter
cartridge rated for 1,000 pages. The first section of this article
covers the theory behind these cartridges. The first three paragraphs
have some interesting information on the reset gears and how they work.
The rest is standard Brother theory. If you are not familiar with
Brother cartridges, it would be best to read through this entire
section. It may save you a few very frustrating hours.