The Dell 1125 mfp was introduced in November 2007. Based on a
21-ppm, 600-dpi laser engine and with a street price of less than $199
(January 2008), these machines are becoming very popular. These machines
are true MFPs in that they print, copy, scan and fax — many MFPs leave
out the fax option but it is standard here. They have a monthly duty
cycle of 9,000 pages per month, and the ADF (Automatic Document Feeder)
holds up to 30 pages. The processor is 133MHz, and the memory is fixed
at 32MB; it cannot be expanded.
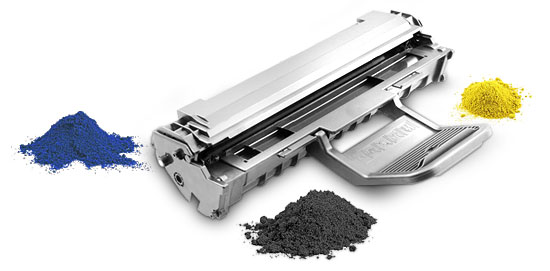
The high-capacity toner
cartridge (2,000 pages) lists for $62.99, and the low-yield cartridge
(1,000 pages) lists for $49.99. New drum units sell for $65. These are
all simple cartridges and are relatively fast to remanufacture.
It is interesting that the drum units are not available online. They
are only available through Dell directly. That should make the
remanufactured cartridges much more popular!
On the Dell Web site I
found multiple part numbers for the cartridges. I am listing them both
here. The cartridges used are as follows:
310-9318,
XP092 Dell 1,000-page toner cartridge
310-9319, XP407 Dell
2,000-page toner cartridge
310-9320, TU031 Dell 20,000-page OPC
cartridge
Supplies required
1) Dell 1125 mfp toner, 68g
bottle 2) Replacement chip for toner cartridge 3)
New replacement drum 4) New doctor blade (optional) 5)
New developer roller sleeve (optional) 6) Small bottle of
acetone (available from your local hardware store) 7)
Toner magnet cloths 8) Lint-free synthetic cotton 4–by-4-inch
pads 9) 99 percent pure isopropyl alcohol 10) Cotton
swabs
Tools required
1)
Toner-approved vacuum 2) Phillips-head screwdriver 3)
Jewelers screwdriver set
Remanufacturing
instructions
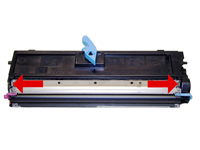
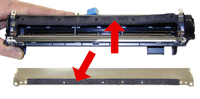
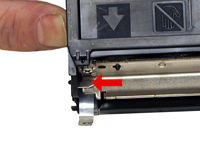
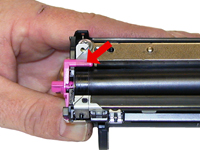
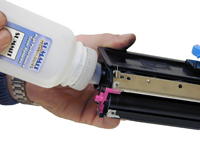
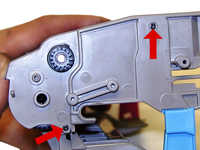
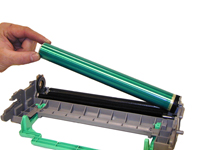
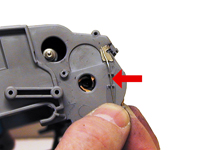
1) Remove the fill plug on the end of
the cartridge. Dump the old toner out and discard. Vacuum the outside
of the housing and the developer roller. Turn the developer roller a few
times to vacuum all sides of the roller. See Figure 1.
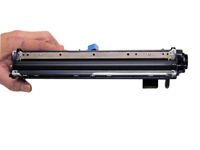
Although
we don’t recommend it, once clean, you can fill the cartridge, install
the plug and you’re done! We don't recommend this way because the doctor
blade needs to be cleaned each cycle. Failure to do this will allow
toner to build up on the blade, causing vertical streaks and eventually,
a ruined developer roller. The best way is as follows:
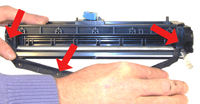
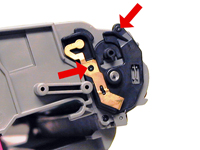
2)
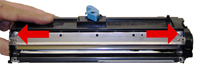
To fully clean this cartridge, the developer roller must be removed.
3) Remove both springs from each side of the developer roller. See
Figure 2.
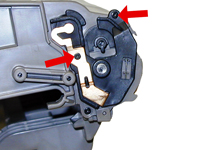
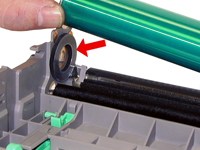
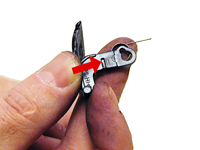
4) Remove the blue colored bushing from the left side. See Figure 3.
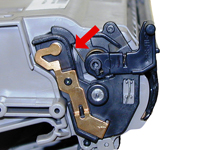
5) Remove the pink bushing from the right side. See Figure 4.
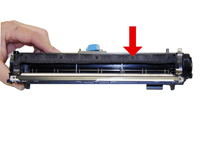
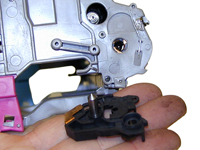
6) Remove the developer roller. See Figure 5.
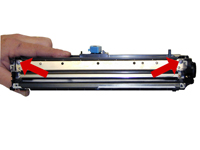
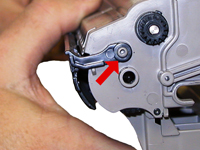
7) Remove the two screws from the doctor blade. See Figure 6.
8) Remove the doctor blade. Carefully separate the foam seal from
underneath the blade. Be careful not to tear this foam as the cartridge
will leak. See Figure 7.
9) Clean any remaining toner dust from the hopper and seals. See Figure
8.
10) Clean the doctor blade with a cotton swab and a small amount of
acetone. Remove any remaining residue with another cotton swab and 99
percent isopropyl alcohol.
11) Align the foam seal onto
the small plastic posts on the hopper. See Figure 9.
12) Install the doctor blade and two screws. Make sure the
contact leaf spring is touching the back side of the blade. See Figures
10 and 11.
13) Clean the developer roller sleeve with a lint-free cotton cloth,
and place aside.
14) Install the developer roller, gear side to
the left. Make sure the clear spacers have the flat side down and that
they are not crimped. See Figures 12 and 13.
15) Install the pink bushing on the right side of the developer roller.
The clear plastic band should be over the arm of the bushing. See
Figures 14 and 15.
16) Install the blue spacer onto the left side of the developer
roller. The clear plastic band should be over the arm of the bushing.
See Figure 16.
17) Install the small springs on both sides of the developer roller.
The clear plastic band should be under the bushing. See Figures 17 and
18.
18) Fill the cartridge with 1125 toner (68 grams). See Figure
19.
19)
Install the developer roller cover. The clear plastic band should be
under the bushing. See Figure 20.
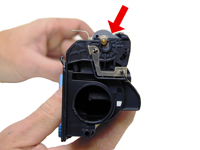
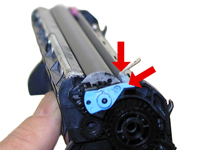
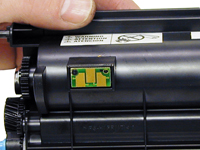
20) Replace the used chip with a new one. See Figure 21.
The
toner cartridge is finished!
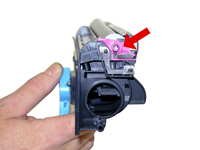
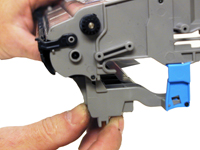
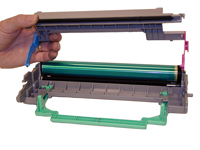
Drum unit instructions
21) On the drum unit, remove the drum cover, non-spring side first.
Turn the spring side so that the slot in the hole lines up with the pin
and remove the cover. Watch out for the spring! See Figures 22 and 23.
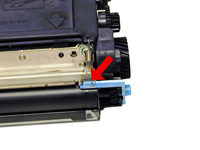
22) Remove the two small Phillips-head screws from the black end
cap. Remove the end cap. See Figures 24 and 25.
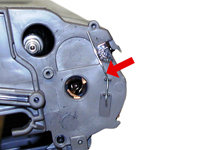
23) Remove the small metal wire contact so it does not get lost. See
Figure 26.
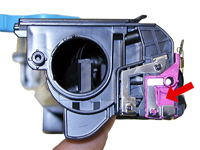
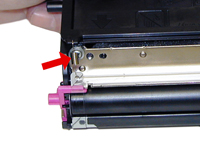
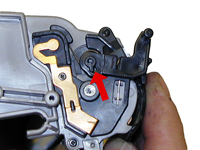
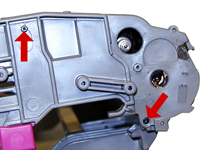
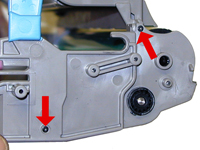
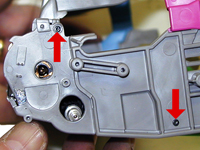
24) Remove the two small Phillips-head screws from the frame as
indicated. See Figure 27.
25) On the opposite side, remove the two small Phillips-head screws
from the frame as indicated. See Figure 28.
26) Remove the bottom cover. See Figure 29.
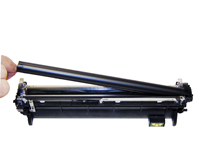
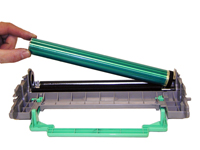
27) Remove the drum. See Figure 30.
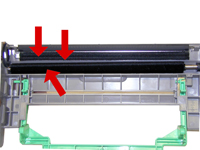
28)
Clean off all the waste toner from the felt roller and the felt brushes
with compressed air. See Figure 31.
29)
Install the new drum, drive-gear first. On the hub side make sure you
do not damage the foam seal. See Figures 32 and 33.
30) lean and re-install the bottom cover and four screws (two on
each side). See Figures 34 and 35.
31)
Install the metal wire contact. See Figure 36.
32)
Install the black end cap and two screws. See Figure 37.
33)
Set the spring on the drum cover as shown. Set the spring tail. See
Figures 38 and 39.
34)
Install the opposite side of the drum cover. See Figure 40.
The
drum cartridge is finished!
Reset the printer as per the
reset directions below.
Printing a test page:
Press
RETURN four times followed by the PAUSE button once
When the
display states Enter Password use 17951 and press START
Press
SCROLL to select Printer and press SELECT
The display states
"Print Test page?”
Press SELECT
The test page is printed
Cleaning
the drum:
Press SCROLL to select Setup and press
SELECT
Press SCROLL to select Maintenance and press SELECT
Press
SCROLL to select Clear Drum and press SELECT
When the message
"Clear Drum?” is displayed, press SCROLL to select Yes and press SELECT
The
display will show Cleaning Drum
Resetting
the drum counter:
Press SCROLL to select Setup and
press SELECT
Press SCROLL to select Maintenance and press SELECT
Press
SCROLL to select Reset Drum Count and press SELECT
Press SCROLL
to select Yes and press SELECT
The display states Saved and the
counter is reset!
Printer Troubleshooting:
These
machines use plain English error messages. There is really no need to
go through them here.
Mike Josiah is technical director
at Summit Technologies, a division of UniNet Imaging Inc. Josiah has
been with the company since 1987. Contact him at 631-218-8376 or
mjosiah@uninetimaging.com.