Refill instructions №564, №920XL cartridge for HP OfficeJet 6000 / 6500 / 7000/Photosmart D5445/D5460/ C6340/C6350/C6380/ D7560/C410a/B8550
Refill instructions, How to refill ink Cartridge №564, №920XL cartridge for HP OfficeJet 6000 / 6500 / 7000
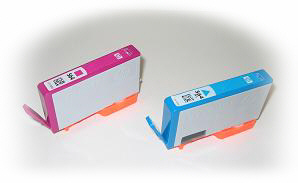
Hewlett Packard #564 or #920 Theory - The ink in these cartridges are retained because the cartridges have an internal sponge. There are two methods you can use to refill this cartridge. Use the one that suits you the best. Method One 1. Put the cartridge on some paper towels in an area where you can tolerate a spill. 2. With a rubber band tightly put on the orange cap that covered the outlet port. If you no longer have the orange cap then put on a vinyl glove and put your finger over the outlet port. This will prevent ink from dripping out while you refill. 3. For the standard 564 (or 920) fill the syringe with 4 ml. of the appropriate color of ink for the 564XL (or 920XL) fill the syringe with 8 ml. of the appropriate color of ink. 4. You are going to fill the cartridge through the vent hole. To see the vent hole peel off the top label.
If you can see the impression of the vent hole through the label then just push the needle through the label into the vent hole and down into the sponge. 5. Very S-L-O-W-L-Y inject ink into the small "vent hole" located on top of the cartridge. 6. After the ink is injected keep the orange cap on or keep your finger over the outlet port for another minute. This will give the ink time to soak up into the sponge. 7. Now take off the orange cap or remove your finger from the outlet port and place the cartridge in a cup or bowl or anywhere else you can tolerate some dripping. Let any excess ink the sponge can't hold drip for about 2 minutes. 8. Put the cartridge(s) back into the printer and run 1 - 3 cleaning cycles as per printer instructions. You can't over fill a 564 (or 920) and make it a 564XL (or 920XL) because the 564 (or 920) standard has about half of the cartridge walled off and the sponge only covers the other half of the cartridge as seen at the left. The 564XL (or 920XL) has a gap in the wall and there is actually ink in the reservoir next to the sponge as seen at the right. As ink is used from the cartridge, the reservoir feeds the sponge with more ink. When refilling the 564XL (or 920XL), go extra slow to give the ink a chance to fill not only the sponge but also the reservoir chamber. Ink will come out of the cartridge vent hole if you fill too fast or put in too much ink. On the 564 and 920 series cartridges, there is an electronic counter embedded in a small computer chip/board. This counter starts at a high number and decreases for every character printed. Eventually, the counter reaches zero. At this point, an error message is generated by the printer. If you click "OK" to the error message, the printer will continue to print. However, the ink level display will not show correctly with that cartridge. On some HP printers, simply click through the error message and the various warnings. The printer should then print fine. Notice that you will need to do this again when the other cartridges run out of ink. On other HP printers, hold the RESUME or RESET button for about 10-15 seconds. This should reset the printer so that it will print with the refilled cartridge. Method Two (not recommended for the XL version) Instructions
Step 1) Put the cartridges on some paper towels in an area where you can tolerate a spill. Step 2) Turn the cartridge up side down so that the outlet port of the cartridge is facing upward. Step 3) For the standard 564 fill the syringe with 4 ml. of the appropriate color of ink
Step 4) Drip ink onto the felt pad in the outlet port. The felt pad will quickly absorb the ink into the cartridge. If the felt pad will not soak up any more ink and the ink just sits on top or you see some ink coming out of the vent hole located on the opposite side then the sponge is full. Dab a paper towel onto the felt pad to soak up any ink that did not get absorbed into the cartridge. It goes without saying that you want to put the correct color into the correct chamber. Don't drip yellow ink onto the cyan felt pad and wonder why you are now getting green. Note: Do not pierce the felt pad with the needle of the syringe. Step 5) Replace the cartridge and run 1 - 3 cleaning cycles as per printer instructions.
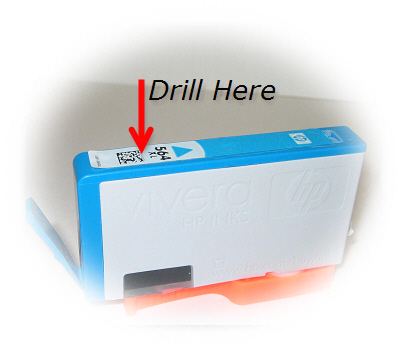
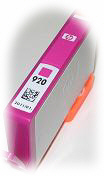
If necessary leave cartridge in printer for up to 4 hours to allow the ink to saturate the entire sponge. Method for XL type cartridges 1. Put the cartridge on some paper towels in an area where you can tolerate a spill. 2. With a rubber band tightly put on the orange cap that covered the outlet port. If you no longer have the orange cap then put on a vinyl glove and put your finger over the outlet port. This will prevent ink from dripping out while you refill. 3. Drill a small hole on the reservoir side of the cartridge (this will be above the small clear window) 4. Very S-L-O-W-L-Y inject ink into the drilled hole. 5. Seal the drilled hole air tight. You can use a hot glue gun or hot wax. Be sure the area around the hole is clean and dry before sealing. 6. Now take off the orange cap or remove your finger from the outlet port and place the cartridge in a cup or bowl or anywhere else you can tolerate some dripping. Let any excess ink the sponge can't hold drip for about 2 minutes. 7. Put the cartridge(s) back into the printer and run 1 - 3 cleaning cycles as per printer instructions.
 Hewlett Packard #564 or #920 Theory - The ink in these cartridges are retained because
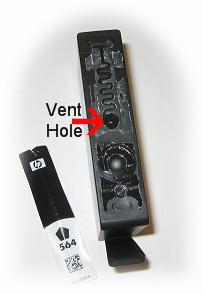
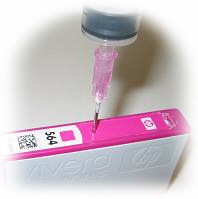 If you can see the impression of the vent hole through the label then just push the needle through the label into the vent hole and down into the sponge. 5. Very S-L-O-W-L-Y inject ink into the small "vent hole" located on top of the cartridge. 6. After the ink is injected keep the orange cap on or keep your finger over the outlet port for another minute. This will give the ink time to soak up into the sponge. 7. Now take off the orange cap or remove your finger from the outlet port and place the cartridge in a cup or bowl or anywhere else you can tolerate some dripping. Let any excess ink the sponge can't hold drip for about 2 minutes. 8. Put the cartridge(s) back into the printer and run 1 - 3 cleaning cycles as per printer instructions.
 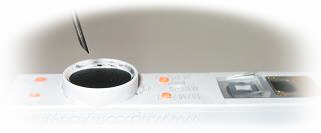 If necessary leave cartridge in printer for up to 4 hours to allow the ink to saturate the entire sponge. Method for XL type cartridges 1. Put the cartridge on some paper towels in an area where you can tolerate a spill.