Remanufacturing the Brother HL 4040 Series Toner Cartridges
The Brother HL-4040 printer engine is based on a new 21-ppm black and color, 2,400-by-600 dpi color laser engine. The machines come standard with 64 MB expandable to 576 MB of memory, and all run off a 300 MHz-processor. With print speeds of 21 ppm and a list price starting at $299, these machines are becoming very popular.The toner cartridges do not have a reset chip on them, but do have a reset gear that must be positioned properly for the machine to accept it as a new cartridge. From my research, the starter cartridges that initially came with new printers (TN-110) did not come with rest gears, but all the new starters I have seen now do. The proper reset positions of the gears will be covered later in this instruction.
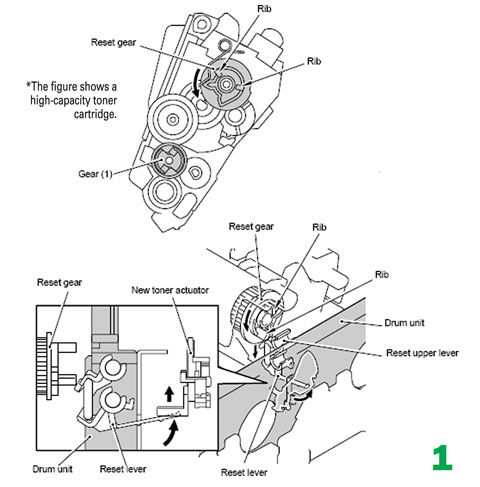
As with some of the Brother monochrome cartridges, there are different reset gears used for the LY and HY cartridges. Figures 1 and 2 on the next page show the new toner detection system and the developer bias voltages when a new cartridge is installed.
When the printer senses a new toner cartridge, the bias voltage is set to a high voltage. As the cartridge is used, the bias voltage is reduced gradually down to a lower voltage. This process is necessary because, according to Brother, a new toner cartridge has a tendency to print light. As the cartridge is used, the density increases. To keep the density level even throughout its life, the density bias voltage is reduced accordingly. (See Figure 2) This is why there are two different reset gears. For the low life cartridge, the gear has one rib and the bias voltage is reduced over the life of 2,500/1,500 pages. For the high-yield cartridge, the gear has two ribs and the bias voltage is reduced over 5000/4000 pages.
Each time a new cartridge is installed, Gear 1 (See Figure 1) engages the gear train. The rib on the reset gear pushes down on the upper reset lever that is attached to the drum unit. This lever turns and pushes up the new cartridge actuator. The bias voltage is then reset, and the cartridge page count is reset to zero.

While the cartridge yield is stated in pages printed, it actually is based on the revolutions of the developer roller. The upper limit for the HY black is 111,000 revolutions or 6,000 pages x 18.5 revolutions. Brother factors in 18.5 revolutions per page to account for the actual number of revolutions when printing plus the idle rotation revolutions that occur when the printer is on and idle. The stated yield of the HY black cartridge is 5,000 pages at 5 percent coverage. The upper limit allows for less toner per page to be used before the printer stops printing.
When the printer is in a monochrome print mode versus a color print mode, the C, M, and Y cartridge developer rollers are disengaged so that only the black developer roller has any revolutions.
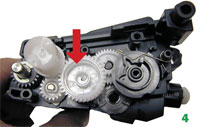
There are also different versions of the TN-110 as far as the non-reset gears in the cartridge itself. The initial cartridges had an idle gear positioned above the gear train, and the newer cartridges have the idle gear positioned below. This only matters if you want to convert a LY TN-110 to a HY TN-115 cartridge. Because of the gear positioning, the older style cartridges with the idle gear on top of the gear train cannot be converted to a HY.
The diameter of the gears is smaller in the old version, and cannot handle the stress of a HY load. There are no problems converting the new style cartridges. Figure 3 shows the old style TN-110 and Figure 4 shows the new style.

Current machines released so far are:
- HL-4040CN
HL-4050CDN
HL-4070CDW
DCP-9040CN
DCP-9045CDN
MFC-9440CN
MFC-9840CDW
There are two different yielding series of toner cartridges available for these machines, the TN-110 and the TN-115. The yields of the cartridges as well as the various worldwide versions are listed below.
The drum unit is new as well: part number DR-110CL and is rated for 17,000 pages. This unit has four separate drums laid out in line. It will be covered in a future article. Other consumables are the transfer belt — rated for 50,000 pages — and the waste toner box, that is rated for 20,000 pages
North America
- TN-110BK
2,500 pages
TN-110C/M/Y 1,500 pages
TN-115BK 5,000 pages
TN-115C/M/Y 4,000 pages
South America (Except Argentina)
- TN-110BK 2,500 pages
TN-110C/M/Y 1,500 pages
TN-115BK 5,000 pages
TN-115C/M/Y 4,000 pages
Argentina
- TN-115BK
5,000 pages
TN-155C/M/Y 4,000 pages
Europe, Middle East, Africa
- TN-130BK 2,500 pages
TN-130C/M/Y 1,500 pages
TN-135BK 5,000 pages
TN-135C/M/Y 4,000 pages
Asia, Australia
- TN-150BK
2,500 pages
TN-150C/M/Y 1,500 pages
TN-155BK 5,000 pages
TN-155C/M/Y 4,000 pages
China
- TN-170BK
2,500 pages
TN-170C/M/Y 1,500 pages
TN-175BK 5,000 pages
TN-175C/M/Y 4,000 pages
If you’re familiar with Brother cartridges, you know they do not work like other manufacturers’ cartridges. This series of printers is no exception. Because of that, we will cover the printing theory here.
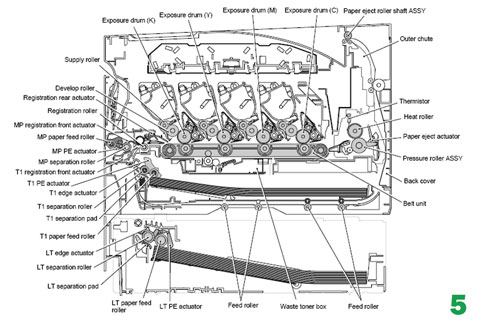
Figure 5 shows a broad overview of the printing process and the component locations. As you can see these machines use a single pass type system. Figure 6 is a simple diagram that shows the six basic steps in the printing process.

In the first stage, the Primary Corona Wire places a uniform negative 870 VDC voltage on the Corona wire grid which then charges the OPC drum surface. The amount of the negative DC voltage placed on the drum is controlled by the printer’s intensity setting. See Figure 7 on next page.
While most manufacturers have switched over their production to PCRs to eliminate ozone health issues, Brother states that the amount of ozone expelled from the printer is less than 3.0 mg/h and therefore not harmful to the human body and that applicable safety standards have been complied with.
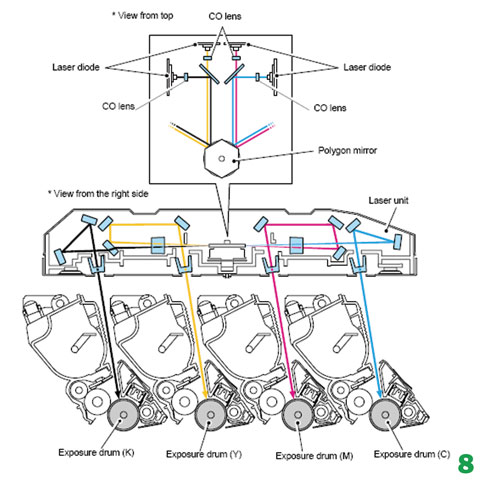
In the second stage,
each color laser beam is fired onto a rotating mirror (called the
scanner). In this system, four separate beams are focused through a
series of lenses, bounced off a mirror and then to the scanner motor or
polygon mirror as listed in the diagram.
The beam then strikes
the drum’s surface, reducing the negative charge and leaving a latent
electrostatic image on the drum. The areas where the laser did not
strike the drum will retain the higher negative charge.
This Brother system uses four separate laser units and one scanner mirror. The top of Figure 8 shows the top view of the different lasers, the bottom half shows the view from the right side.
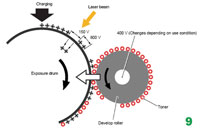
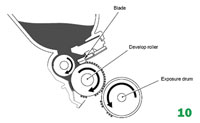
The third or developing stage is where the toner is developed on the drum by the developing section (or supply chamber), which contains the toner particles. The development stage is actually made up of two steps: toner charging and the actual development. In the toner charging stage, the foam feed roller brings the toner to the developer roller. The developer roller has a charge placed on it based on the density setting and the amount of pages printed as set by the reset gear. The doctor blade controls the amount of toner on the roller.
As the laser exposed areas of the OPC Drum approach the developer roller, the toner particles are attracted to the drum’s surface due to the opposite voltage potentials of the toner, and laser-exposed areas of the OPC drum. See Figures 9 and 10
The fourth stage is the transfer stage. In the transfer stage, the transfer roller that is located directly opposite each OPC drum places a positive DC bias charge on the back of the image transfer belt. Each toner cartridge has a separate transfer charge roller. The image is transferred from the drum directly to the paper. This process is repeated for each color cartridge in the following order: black, yellow, magenta, and cyan. See Figure 11.
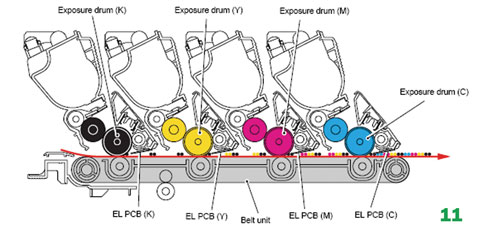
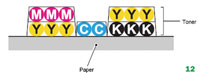
Figure 12 shows how the different basic colors are stacked to get different colors.
After the transfer takes place, the printer turns on a set of LED lamps that irradiate the drums surface to keep the surface potential constant. This step helps eliminate ghost images.
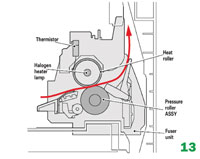
In the fifth stage, the image is then fused onto the paper with the fuser assembly. The fuser assembly is comprised of the upper heating roller and lower pressure roller. The lower pressure roller presses the page up into the upper heating roller that then melts the toner into the paper. This heating assembly consists of a hard metal-coated roller with a halogen lamp inside. See Figure 13.
The sixth stage is where the drum is cleaned. The drum is cleaned after the image is transferred to the paper by a cleaning roller. This roller uses a DC voltage to attract the residual toner off the drum. After the cleaning roller has cleaned the drum, the DC potential is raised and the toner is then transferred back to the drum, where it is then transferred to the image transfer belt. The waste toner is then cleaned off the belt by the belt-cleaning roller and stored in the belt waste chamber. See Figure 14
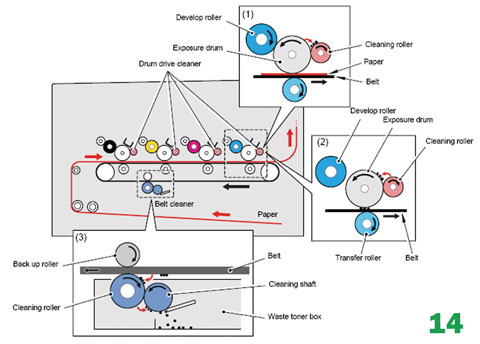
While this is taking place, the developer roller is moved away from the drum so that it is not contaminated by the waste toner. This cleaning system, while somewhat similar to other Brother systems, is different in that none of the waste toner is recycled back into the new toner supply.
Instructions on how to run test pages, printer troubleshooting as well as common cartridge problems will be covered at the end of this article.
Remanufacturing instructions
Tools required1) Toner-approved vacuum
2) Phillips-head screwdriver
3) Small common screwdriver
4) Needle-nose pliers
Supplies required
1) Brother HL-4040 Toner Choose the correct color and gram weight for your cartridge
2) Reset gear for the older starter cartridge or if converting a LY to a HY cartridge (See text)
3) Lint-free cotton cloths
4) Toner magnet cloths
[1] Vacuum the exterior of the cartridge. Be careful not to damage the developer roller as it is exposed.
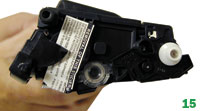
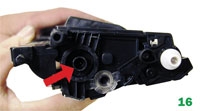
[2] Remove the fill plug from the toner cartridge. Dump the remaining toner and vacuum/blow out the cartridge. There will probably be a label over the fill plug. It comes off with a little alcohol and a lint-free cloth or cotton swab. See Figures 15 and 16.
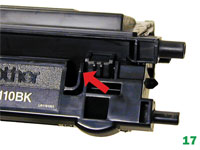
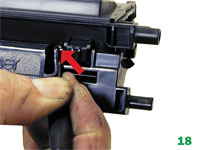
[3] Remove the handle by sliding the handle to the right and pulling back on the tab with your finger. See Figures 17 and 18.
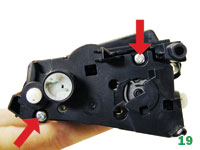
[4] With the
handle facing you, remove the two screws on the left end cap. See
Figure 19.
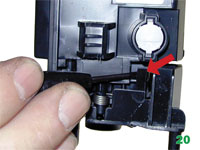
[5] Lift up on the tab indicated and remove the end cap. See Figure 20.
[6] Remove all the gears and reset spring. See Figure 21.

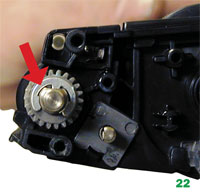
[7] Remove the E-ring and
developer roller gear. See Figure 22.
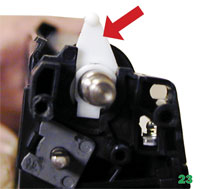
[8] Move the white plastic locking tab on the right side of the developer roller to the up position. See Figure 23.
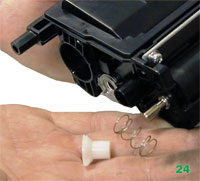
[9] Gently pry off the white bushing on the opposite side of the developer roller. Be careful not to lose the spring! See Figure 24.
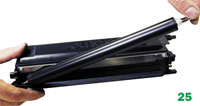
[10] Remove the developer roller. See Figure 25.
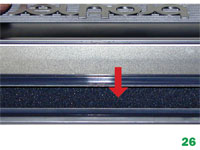
[11] Vacuum/blow the cartridge clean. Be sure to rotate the foam feed roller so it is fully cleaned. See Figure 26.
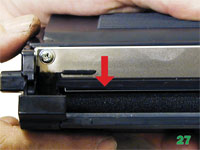
[12] Vacuum/blow the doctor blade. We do not recommend that the doctor blade be removed as the developer roller felt seals will be disturbed. Once a new blade is available, great care will have to be taken not to tear the seals causing a leak. The doctor blade can be easily cleaned by blowing the excess toner off, and wiping down with a lint-free cloth. Be very careful not to leave any lint behind and do not use any chemicals to clean it. See Figure 27.
[13] Inspect the magnetic
roller felts. If they are compressed (shiny), rough them up with a small
screwdriver. See Figure 28.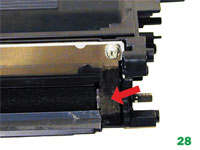
[14] Clean the developer roller
with a lint free cloth. Do not use any chemicals to clean the roller. A
dry, clean, lint free cloth will work fine.
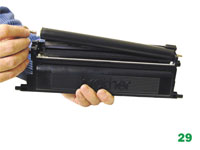
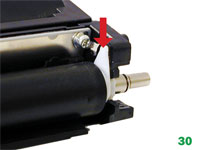
[15] Reinstall the
developer roller long shaft side to the gear side, and white lock
pointing up. Turn the lock towards the doctor blade until it locks in
place. See Figures 29 and 30.
[16] Install the
spring and bushing on the non-gear side of the roller. Make sure the
bushing moves freely. See Figure 31.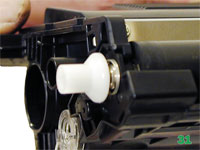
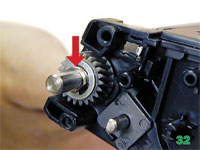
[17] Install the developer roller
gear and E-ring. See Figure 32.
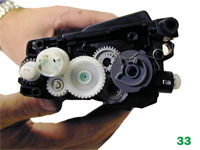
[16]Clean the gears, making sure that they have no toner on them. This is a good time to also check the gear shafts to make sure there is enough grease. If the shafts appear dry, or the grease is contaminated with toner, clean the shaft and inside of the gear. Replace the grease with white lithium grease. See Figure 33.
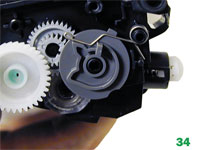
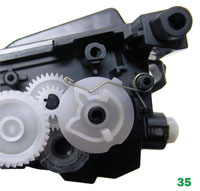
[18] Set the reset gear and spring as shown. The tail of the spring fits into a notch at the base of the gear. There are different gears for the TN-110 and TN-115. Each should be set as shown. See Figures 34 and 35.
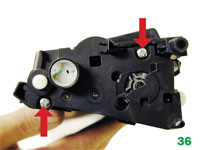
[19] Install the gear cover plate, and two screws. See Figure 36.
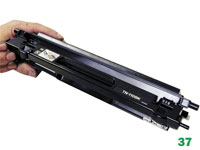
[20] Install the cartridge handle. See Figure 37.
[21] Fill the cartridge with the appropriate color and amount of Brother HL-4040 toner. See Figure 38.

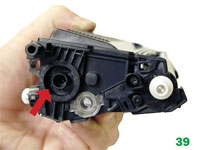
[22] Replace the fill plug. See Figure 39.
[23] Wipe the
cartridge down to remove any remaining toner dust.
[24] Install
the developer roller cover. This is important as the developer roller is
exposed and is easily damaged or contaminated. See Figure 40.

Printing a
Test Page
Printer Setting pages:
Press the OK button
three times while the printer is in the READY state.
The printer will
show "Print Settings/printing” on the LCD. The HL-4040/4050 will run
three pages; the HL-4070 will run four pages.
Drum
Cleaning page
Press the UP or DOWN arrows until
"Maintenance 31” shows on the display
Press OK
The display shows
"Drum Cleaning”
Load the cleaning sheet into the MP tray
Press GO
The
cleaning process is started!
Machine Troubleshooting
All the
machine error codes are in plain English so there is no need to go into
them here.
Repetitive Defect Chart
Developer
Roller 37.4mm
OPC Drum 75.0mm
Upper Fuser Roller 78.5mm
Lower
Pressure Roller 78.5mm
Mike Josiah is technical director at Summit Technologies, a division of UniNet Imaging Inc., a global distributor of toner, OPC drums, wiper blades and other supplies. Josiah has been with the company since 1987. He and his technical support team regularly contribute articles and teach seminars at association meetings and trade shows. Contact him at 631-218-8376 or mjosiah@uninetimaging.com.