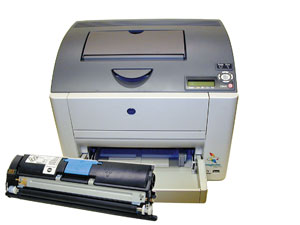
First released in January 2005, the Magicolor 2400 series
of machines are based on a 20-ppm black, 5-ppm color print engine. The
2400 series has a base resolution of 600-by-600 dpi, enhanced resolution
of 2400-by-600 dpi.
One interesting thing with these machines is, like the 2300 series,
there is a humidity/temperature sensor that feeds information to the
main PCB. This information is used to help determine what the DC bias
voltages should be for optimum printing, and assists the fusing
temperature control.
Unlike the previous 2300 series, these machines use chips on the
toner cartridges, and they must be replaced each cycle. There are also
different chips used for different regions around the world. Make sure
you have the correct chip for your region.
The machines based on
the 2400 series engine are:
Magicolor 2400W
Magicolor
2430DL
Magicolor 2450
Magicolor 2480MF
Magicolor
2490MF
Magicolor 2500WF
Magicolor 2530DL
Magicolor
2550DN
Magicolor 2550EN
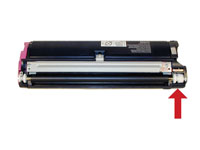
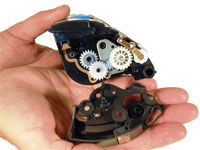
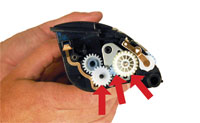
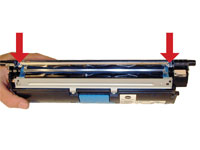
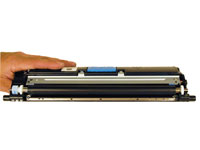
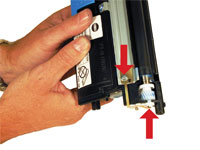
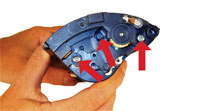
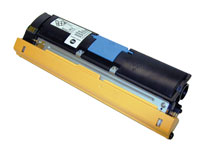
Although, at first glance, the 2300 cartridges look the same as the
2400 series, they are very different. See Figures 1 and 2. Note that the
gears are on opposite sides, the handles are different, etc.
There are high-yield cartridges as well as low-yield cartridges
available. As stated above, the cartridges have different part numbers
(chips), for different regions around the world. In addition to the
toner cartridges, there is also a separate drum unit as well as a waste
box.
The cartridges used by these machines by region are as follows:
U.S.
1710587-004 Black HY
4,500 pages at 5%
$87.99*
1710587-007 Cyan HY
4,500 pages at 5%
$133.99
1710587-005 Yellow HY
4,500 pages at 5%
$133.99
1710587-006 Magenta HY
4,500 pages at 5%
$133.99
1710587-003 Cyan LY
1,500 pages at 5%
$69.99
1710587-001 Yellow LY
1,500 pages at 5%
$69.99
1710587-002 Magenta LY
1,500 pages at 5%
$69.99
1710591-001 Drum
45,000 Pages Black 11,250 Color
$153.99
(*Pricing does not include shipping.)
Europe
1710589-004 Black HY
4,500 pages at 5%
1710589-007 Cyan HY
4,500 pages at 5%
1710589-005 Yellow HY
4,500 pages at 5%
1710589-006 Magenta HY
4,500 pages at 5%
1710587-003 Cyan LY
1,500 pages at 5%
1710587-001 Yellow LY
1,500 pages at 5%
1710587-002 Magenta LY
1,500 pages at 5%
1710591-001 Drum
45,000 Pages Black, 11,250 Color
Asia
1710590-004 Black HY
4,500 pages at 5%
1710590-007 Cyan HY
4,500 pages at 5%
1710590-005 Yellow HY
4,500 pages at 5%
1710590-006 Magenta HY
4,500 pages at 5%
1710590-003 Cyan LY
1,500 pages at 5%
1710590-001 Yellow LY
1,500 pages at 5%
1710590-002 Magenta LY
1,500 pages at 5%
Japan
1710588-004 Black HY
4,500 pages at 5%
1710588-007 Cyan HY
4,500 pages at 5%
1710588-005 Yellow HY
4,500 pages at 5%
1710588-006 Magenta HY
4,500 pages at 5%
1710588-003 Cyan LY
1,500 pages at 5%
1710588-001 Yellow LY
1,500 pages at 5%
1710588-002 Magenta LY
1,500 pages at 5%
These machines are based on a carousel type color engine. It
is virtually identical in design to the 2300 series so there is no need
to go into the theory again here.
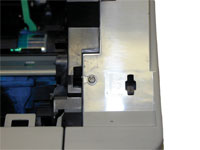
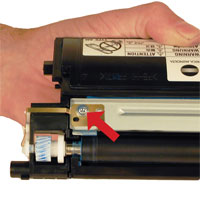
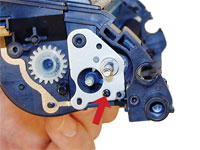
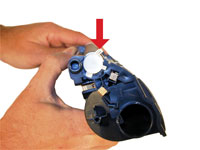
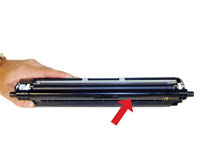
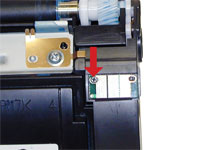
One interesting note is that
sometimes when the printer stops, the carousel does not stop in a
position where a cartridge can be removed. This happened multiple times
to us, on multiple machines. Even when you tell the printer to rotate it
sometimes does not stop in the correct location. Konica Minolta
apparently knows this as they have included a release switch that can be
accessed from the right side of the printer with a small screwdriver or
pen. Depressing this switch allows the carousel to freely rotate and
you can then remove the cartridge(s). See Figure 3.
The
cartridges themselves are very easy to remanufacture and as you can see
from the pricing above, can be very profitable.
Taking test
prints, as well as minor printer troubleshooting, will be covered at the
end of this article.
Supplies required
1)2400 dedicated color toner 2)Shipping cover 3)Lint-free
cloths 4)Conductive
grease 5)Replacement
chip (make sure you have the correct one for your location) 6)Developer
roller cover
Tools required
1)Toner-approved vacuum or dust collection
system 2)Small common
screwdriver 3)Phillips-head
screwdriver (#1) 4)Needle-nose pliers 5)Jewelers
screwdriver set
Remanufacturing instructions
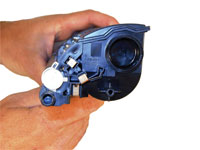
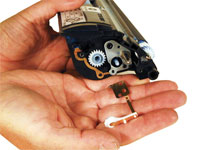
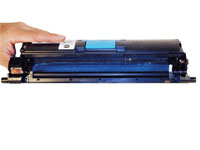
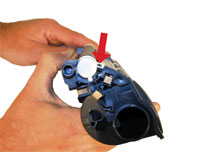
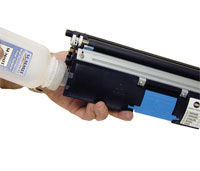
1)
Remove the fill plug, and dump out any remaining toner. See Figure 4.
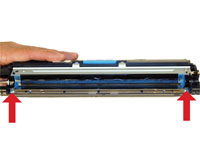
2) On the gear side of the cartridge, remove the three silver screws
from the end cap. See Figure 5.
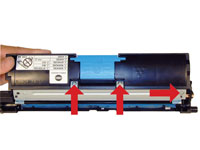
3) Remove the end cap. See Figure 6.
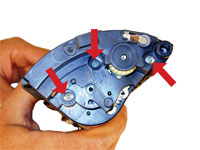
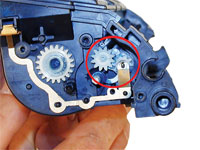
4) Remove the larger drive gear and the two smaller gears next to it.
Leave the mixing blade gear in place. See Figure 7.
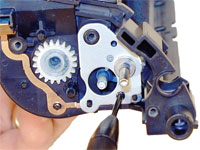
5) Remove the doctor blade contact screw. See Figure 8.
6) Remove the contact/bushing assembly. See Figure 9.
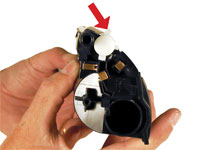
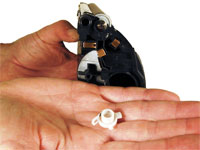
7) Remove the white bushing from the non-gear side by prying up the
center tab and rotating the bushing counterclockwise until it stops. Pry
the bushing off the developer roller shaft. See Figures 10 and 11.
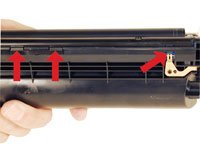
8) Remove the doctor blade cover by prying up the three tabs as
indicated. Remove the cover. See Figure 12.
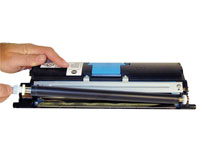
9) Remove the developer roller and gears. See Figure 13.
10) Remove the two screws from the doctor blade. Remove the doctor
blade. See Figure 14.
11) Remove the three screws on the sealing blade assembly. See Figure
15.
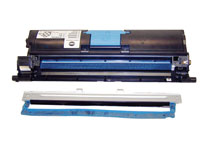
12) Pry up the sealing blade assembly and lift off. The entire foam
seal assembly will come off with it. Be careful not to tear the foam
seals. See Figure 16.
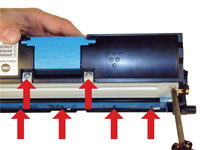
13) Clean out any remaining toner from the hopper and the feed roller.
See Figure 17.
14) Remove the small screw from the feed roller contact plate.
Remove the plate. See Figure 18.
15)
Check to ensure that the contact to the feed roller is clean, and that
the two gears are clean and greased. If not, clean them and re-grease
the gears with white lithium grease. See Figure 19.
16) Re-install the feed roller contact plate and screw. See Figure 20.
17) Install the cleaned sealing blade assembly, seals, contact
and three screws. Make sure the foam aligns with the plastic pins. See
Figure 21.
18) Install the doctor blade and two screws. See Figure 22.
19) Install the developer roller assembly. See Figure 23.
20) On the non-gear side, install the large white bushing tab up, and
rotate clockwise to lock in place. See Figures 24 and 25.
21) Install the three gears from smallest to largest. See Figure 26.
22) Install the contact/bushing assembly and screw. See Figure 27.
23) Install the black end cap on the gear side. Install the three
silver screws. See Figure 28.
24) Install the doctor blade cover. Rotate so that the tabs are aligned
and snap in place. This may take a bit of force to fit properly. See
Figure 29.
25) Fill with the appropriate 2400 color toner. Replace the
fill plug. See Figure 30.
26)
Replace the chip by removing the small Phillips screw. See Figure 31.
27) Install the developer roller cover. See Figure 32.
Taking
test prints
With the printer ready, press the "MENU
SELECT” button once.
Press the left or right arrows until "SPECIAL
PAGES” appears on the display.
Press the "MENU SELECT” button.
Press
the left or right arrows until "TEST PAGES, PRINT,” "CONFIG PAGE” or
"PRINT MENU MAP” appears on the display (your choice).
Press the
"MENU SELECT” button.
Common printer error messages
Most
error codes are self-explanatory, but a few are numeric. We have
included some of the more common ones here.
Fatal Error 08HMain motor not
rotating
Fatal Error 0BHFan motor not rotating
Fatal
Error 0CHPower supply
fan not rotating
Fatal Error 10HScanner motor error
Fatal Error 12H Laser failure
Fatal
Error 16HTransfer belt
not rotating
Fatal Error 17HToner cartridge rack not rotating
Fatal
Error 18HFuser assembly
warm up error
Fatal Error 19HFuser assembly low heat error
Fatal
Error 1AH
Fuser
assembly high heat error
Fatal Error 1BH Fuser assembly thermistor error
Mike
Josiah is vice president of technical services at Summit Technologies, a
division of Uninet Imaging Inc., global distributor of toner, OPC
drums, wiper blades and other supplies. Josiah has been with the company
since 1987. He and his technical support team regularly contribute
articles and teach seminars at association meetings and trade shows.
Contact Mike Josiah at 631-218-8376 or mjosiah@uninetimaging.com.
 First released in January 2005, the Magicolor 2400 series
of machines are based on a 20-ppm black, 5-ppm color print engine. The
2400 series has a base resolution of 600-by-600 dpi, enhanced resolution
of 2400-by-600 dpi.
First released in January 2005, the Magicolor 2400 series
of machines are based on a 20-ppm black, 5-ppm color print engine. The
2400 series has a base resolution of 600-by-600 dpi, enhanced resolution
of 2400-by-600 dpi.