Remanufacturing, Refill the Samsung SCX-4725 Toner Cartridge
Remanufacturing the Samsung
SCX-4725 Toner Cartridge
Dec 01, 2008
First released in January 2008, the Samsung SCX-4725
multifunction printers are based on a 24ppm, 1200 by 1200 dpi engine.
The cartridge is an all in one type that has a chip that must be
replaced each cycle. Depending on the model, the machines are an MFP
that can print, copy, scan (color) and fax (SCX-4725FN only).
These
cartridges do not have a built-in drum cover, but do come new with a
plastic form fitting drum cover. For these cartridges Samsung has
stopped using the heavy paper wrap.
While we will not be
going into the printing theory on this cartridge, it should be noted
that the printer uses a Pre-Transfer Lamp (PTL). This lamp basically
shines a light onto the OPC drum, which lowers the charge on the drum’s
surface and improves the transfer efficiency.
Another
interesting fact about these machines is that in addition to the normal
Toner Low and Toner Empty messages there is also a "Drum Warning”
message. This message first appears when a cartridge is nearing 14,000
pages. The service manual states that after 15,000 pages, the waste
hopper may overflow. The cartridge will shut down at this point
regardless of the amount of toner left. The HY cartridges are rated for
3,000 pages so reaching that point is doubtful. Once toner empty state
has been reached the cartridge will shut down so the only way for a
cartridge to get that high a page count is if very little if any toner
is used per page.
The HY replacement cartridge is
rated for 3,000 pages at 5 percent coverage (ISO 19752). The starter
cartridge (SCX-4525FN) is rated for 1,000 pages.
The HY
cartridge I have seen listed with two different part numbers. The
Samsung Web site shows it as SCX-D4725A/XAA, the service manual lists
the SCX-4725D3 number.
From what I can find the SCX-D4725A/XAA
is the correct number, but in case you come across the D3#, you’ll know
what it is.
So far there are two machines in this series. The
SCX-4725FN and the SCX-4725F.
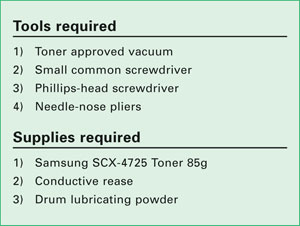
Remanufacturing
instructions
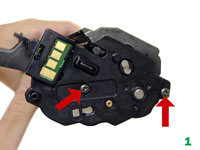
[1] Place the cartridge with the handle
facing away from you. Remove the two screws on left end cap. See
Figure 1.
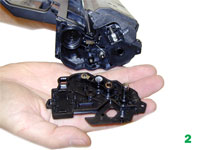
[2] Gently pry off the left
end cap. See Figure 2.
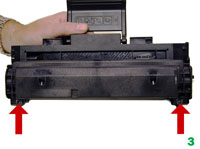
[3] On the front edge of the cartridge,
there are two screws, remove them. See Figure 3.
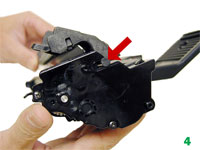
[4] Lift up and remove the waste
chamber from the cartridge. Make sure the tabs on the left and right
sides slide out of the slot. If you try to lift the cover off without
sliding the tab out, they will break off. See Figure 4.
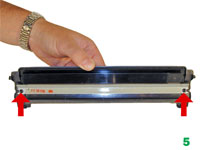
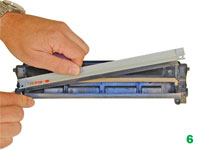
[5] Remove the two screws and wiper
blade from the waste chamber. See Figures 5 & 6.
[6] Clean out any remaining toner
from the waste chamber.
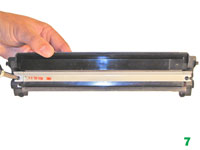
[7] Re-install the wiper blade and
two screws. Place the waste chamber aside. See Figure 7.
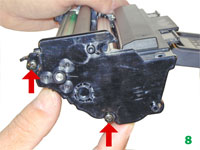
[8]
Remove the two screws from the right side end cap. Carefully pry off
the end cap. See Figure 8.
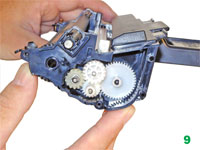
[9] Remove the four
gears, and place aside. See Figure 9.
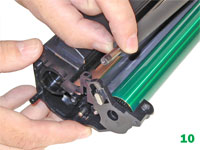
[10] Slide the
PCR away from the contact side, lift up and remove. See Figure 10.
Clean the PCR with your normal PCR cleaner.
WARNING: Do not clean the
OEM PCR with alcohol, as this will remove the conductive coating from
the roller. If the PCR is an aftermarket, follow the cleaning methods
recommended by the manufacturer. If the PCR is an OEM, we recommend it
be cleaned with your standard PCR cleaner.
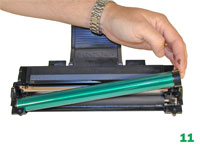
[11] Remove the
OPC drum. See Figure 11.
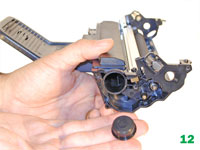
[12] Carefully pry out the
fill plug. It fits tight and is easily damaged. Work a small jeweler’s
screwdriver around the edge until the plug comes free. See Figure 12.
[13] Clean out any remaining toner
from the hopper.
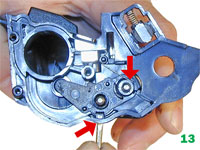
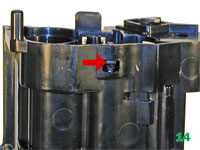
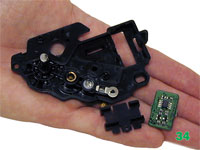
[14] Gently pry out the roller plate from
the cartridge by pressing in on a tab located on the bottom of the
cartridge. There is a spring that is in contact with the developer
roller shaft. Move the tail of the spring up so that as the plate is
lifted out, it will fall behind it. See Figures 13 & 14.
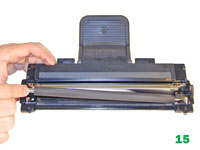
[15] Remove the developer roller by
lifting it out. See Figure 15.
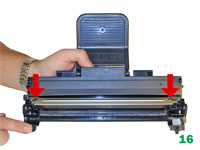
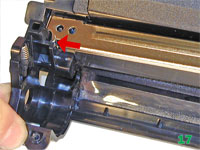
[16] Remove the two screws on the
doctor blade. On the fill plug side of the blade, there is the other
tail of the spring. Lift it up while removing the doctor blade so it is
not damaged. See Figures 16 & 17.
Note: It is highly
recommended that the doctor blade be cleaned. Failure to do so will
cause streaking. Dampen a cotton swab with alcohol, and clean the blade.
Be careful not to press too hard and damage the blade. If the blade has
a heavy buildup of toner on it, clean it with acetone and then alcohol.
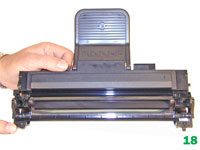
[17]
Clean the feed roller and any remaining toner from the hopper. See
Figure 18.
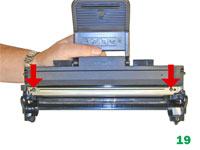
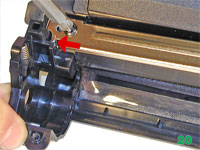
[18) Re-install the doctor
blade and two screws. Make sure the tail of the spring fits into the
proper slot. See Figures 19 & 20.
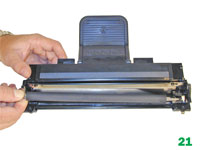
[19] Install the
developer roller, keyed end to the gear side of the cartridge. See
Figure 21.
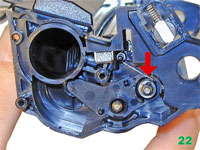
[20] Install the roller
plate. Route the tail of the spring so that it sits on top of the plate
and is in contact with the shaft of the developer roller. Lock the plate
in place with the tab. See Figures 22 & 23.
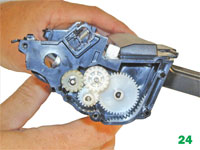
[21] Install the four
gears as shown. See Figure 24.
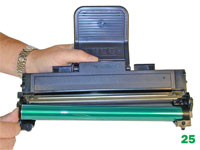
[22] Install the drum
in place. See Figure 25.
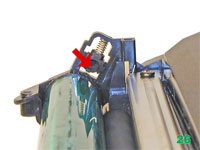
[23] Clean out the old
conductive grease from the PCR contact hub and replace with new. A small
amount of grease is fine, more is not better when it comes to
conductive grease. See Figure 26.
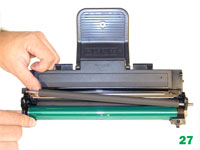
[24] Install the
PCR by sliding it through the non-contact side, and into the contact
hub. See Figure 27.
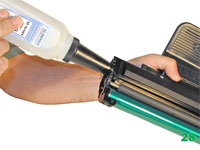
[25] Fill the hopper
with the appropriate toner. Replace the fill plug, check for leaks. See
Figure 28.
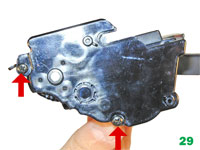
[26] Install the gear side end cap, and two
screws. Make sure the PCR fits correctly in its holder, and all the
gears are aligned. See Figure 29.
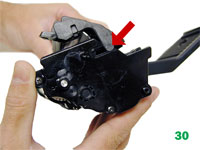
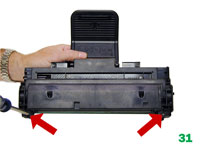
[27] Install the waste
chamber by sliding the tab through the slot in the end cap. Rotate it
down, and install the two screws. See Figure 30 & 31.
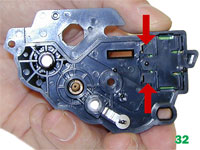
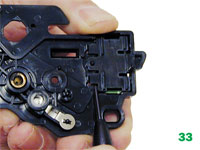
28) On the non-gear end
cap, the chip needs to be replaced before it is installed back on the
cartridge. There are two tabs that lock the chip housing in. Carefully
pry up the two tabs. Remove and replace the chip. Snap the chip housing
back in place. See Figures 32, 33, & 34.
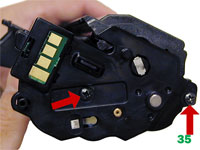
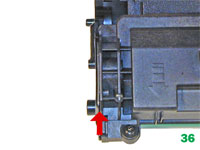
[29] Install the non-gear end
cap and two screws. Make sure the end cap sits flush with the rest of
the cartridge. See Figures 35 & 36.
Printing Test Pages
As
these machines are also copiers, a simply copy of a good test page
should be all you need.
Running the Drum Cleaning Page
Press
the "Menu” button until MAINTENANCE appears on the display.
Press
"Enter”
Press the "Left” or "Right” arrows until CLEAN DRUM
appears on the display
Press "Enter”
Press the "Left” or
"Right” arrows until YES appears on the display
Press "Enter”
Repetitive
Defect Chart
OPC drum — 75.5mm
Lower fuser roller —
75.4mm
Upper fuser roller — 63.9mm
Supply roller — 47.5mm
Transfer
roller — 46.2mm
PCR — 37.7mm
Developer roller — 35.2mm
Machine
Error Codes
These machines use plain English error messages
so there is no need to go into them here.
Mike
Josiah is technical director at Summit Technologies, a division of
UniNet Imaging Inc., a global distributor of toner, OPC drums, wiper
blades and other supplies. Josiah has been with the company since 1987.
He and his technical support team regularly contribute articles and
teach seminars at association meetings and trade shows. Contact him at
631-218-8376 or mjosiah@uninetimaging.com.
 The HY replacement cartridge is
rated for 3,000 pages at 5 percent coverage (ISO 19752). The starter
cartridge (SCX-4525FN) is rated for 1,000 pages.
The HY replacement cartridge is
rated for 3,000 pages at 5 percent coverage (ISO 19752). The starter
cartridge (SCX-4525FN) is rated for 1,000 pages.